Example WebApp
The purpose of this Example web app is to showcase two-way data transfers between the web application and an iOS app using a WebView plugin, allowing the web app to receive user details and redirect users back to the iOS app.
Base URL
The base URL for the Example WebApp is:https://dev-demo.navida-cloud.plus.aok.de/user
Web App Integration as WebView Plugin in iOS App
This document outlines how the web application integrates with an iOS app using a WebView plugin, enabling seamless two-way data transfer.
Overview
The integration allows the web app and iOS app to exchange information effectively. Key features include:
-
Transfer data from iOS App to web app
-
Transfer data from web app to iOS App
-
Redirection to detail view page in web app through WebView in iOS app
1. Transfer data from iOS App to web app
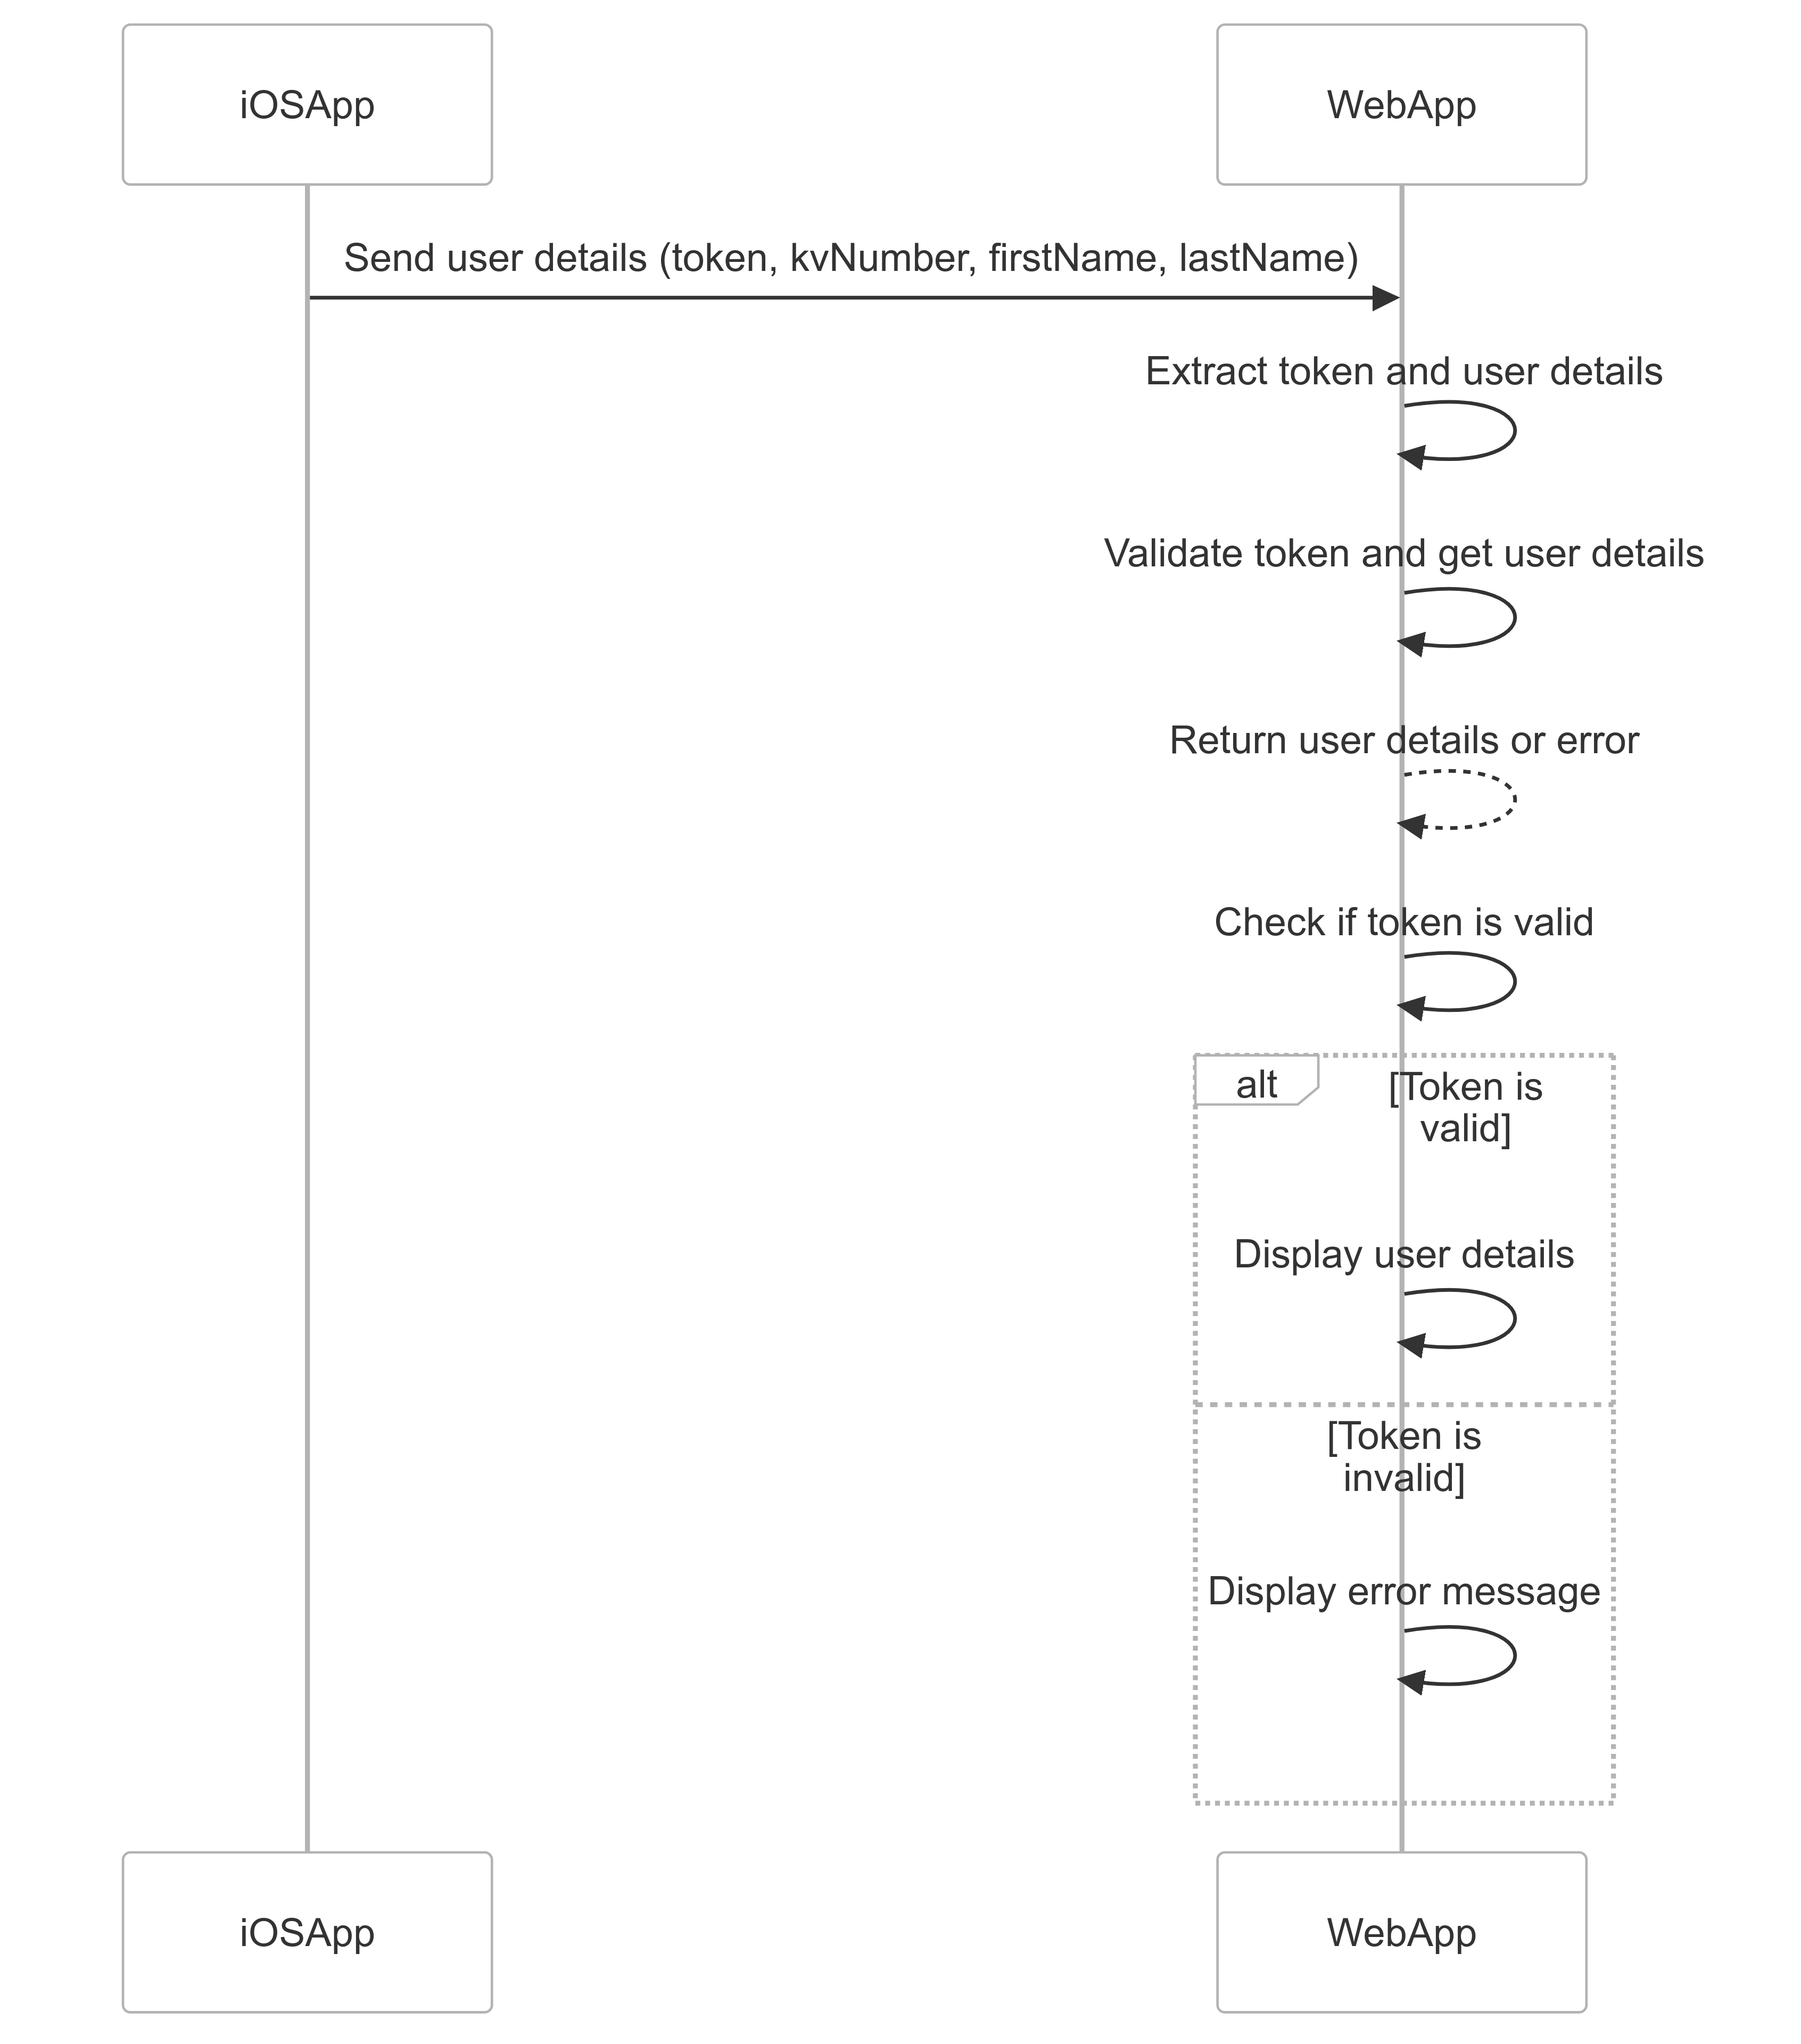
The iOS app sends user details (KV number, first name, last name) and a JWT token to the web app via a REST endpoint. The web app validates the token and displays the user details if the token is valid. If the token is invalid, an error message is displayed.
URL Example
The iOS app sends the following URL to the web app:
https://dev-demo.navida-cloud.plus.aok.de/user?kv=H801947752&first_name=Hans&last_name=Mueller&token=xxsswewewewee
Key Steps in the Process
-
REST Endpoint:
- The endpoint receives the following query parameters:
- token: The JWT token for authentication.
- kv: The KV number of the user.
- first_name: The first name of the user.
- last_name: The last name of the user.
- The endpoint receives the following query parameters:
-
Validation:
- The token is validated to ensure it is authentic and has not expired.
- The
subclaim in the token payload is compared with the KV number provided in the request.
-
Display:
- If the token is valid, the user details are displayed on the web page.
- If the token is invalid, an error message is displayed.
JWT Token Validation
The validation process involves the following steps:
-
Decode the JWT Token:
- Extract the payload from the token, which contains claims such as the expiration time (
exp), subject (sub), and potentially other metadata.
- Extract the payload from the token, which contains claims such as the expiration time (
-
Check Expiration:
- Extract the
exp(expiration) claim from the token payload. - Compare the expiration time with the current time to ensure the token is still valid.
- Extract the
-
Validate KV Number:
- Extract the
subclaim from the token payload. - Compare the extracted
subvalue with the KV number provided in the request.
- Extract the
Example Workflow
-
Input:
- JWT token received from the client.
- User details (e.g.,
kv) provided in the request.
-
Process:
- Decode the token to extract the payload.
- Check the
expclaim to ensure the token is not expired. - Compare the
subin the token payload with the one provided in the request askv.
-
Output:
- If all checks pass, the token is valid, and the user details can be trusted.
- If any check fails, the token is invalid, and an error is returned.
Pseudocode for JWT Validation
function validateToken(token, kvNumberFromRequest):
    // Step 1: Decode the token
    payload = decodeJWT(token)

    // Step 2: Check expiration
    if payload.exp < currentTime():
        throw "Token has expired"

    // Step 3: Validate KV number
    if payload.sub != kvNumberFromRequest:
        throw "KV number does not match"

    // If all checks pass, return the user details
    return payload
<!-- HTML code to display user details -->
<p class="user" th:if="${user} != null and ${error} == null">
    <span th:text="'First Name: ' + ${user.firstName}">Loading...</span><br>
    <span th:text="'Last Name: ' + ${user.lastName}">Loading...</span><br>
    <span th:text="'KVNumber: ' + ${user.kvNumber}">Loading...</span>
</p>
<p class="error" th:if="${user} == null and ${error} != null" th:text="'Error: ' + ${error}">Loading...</p>
2. Transfer data from web app to iOS App
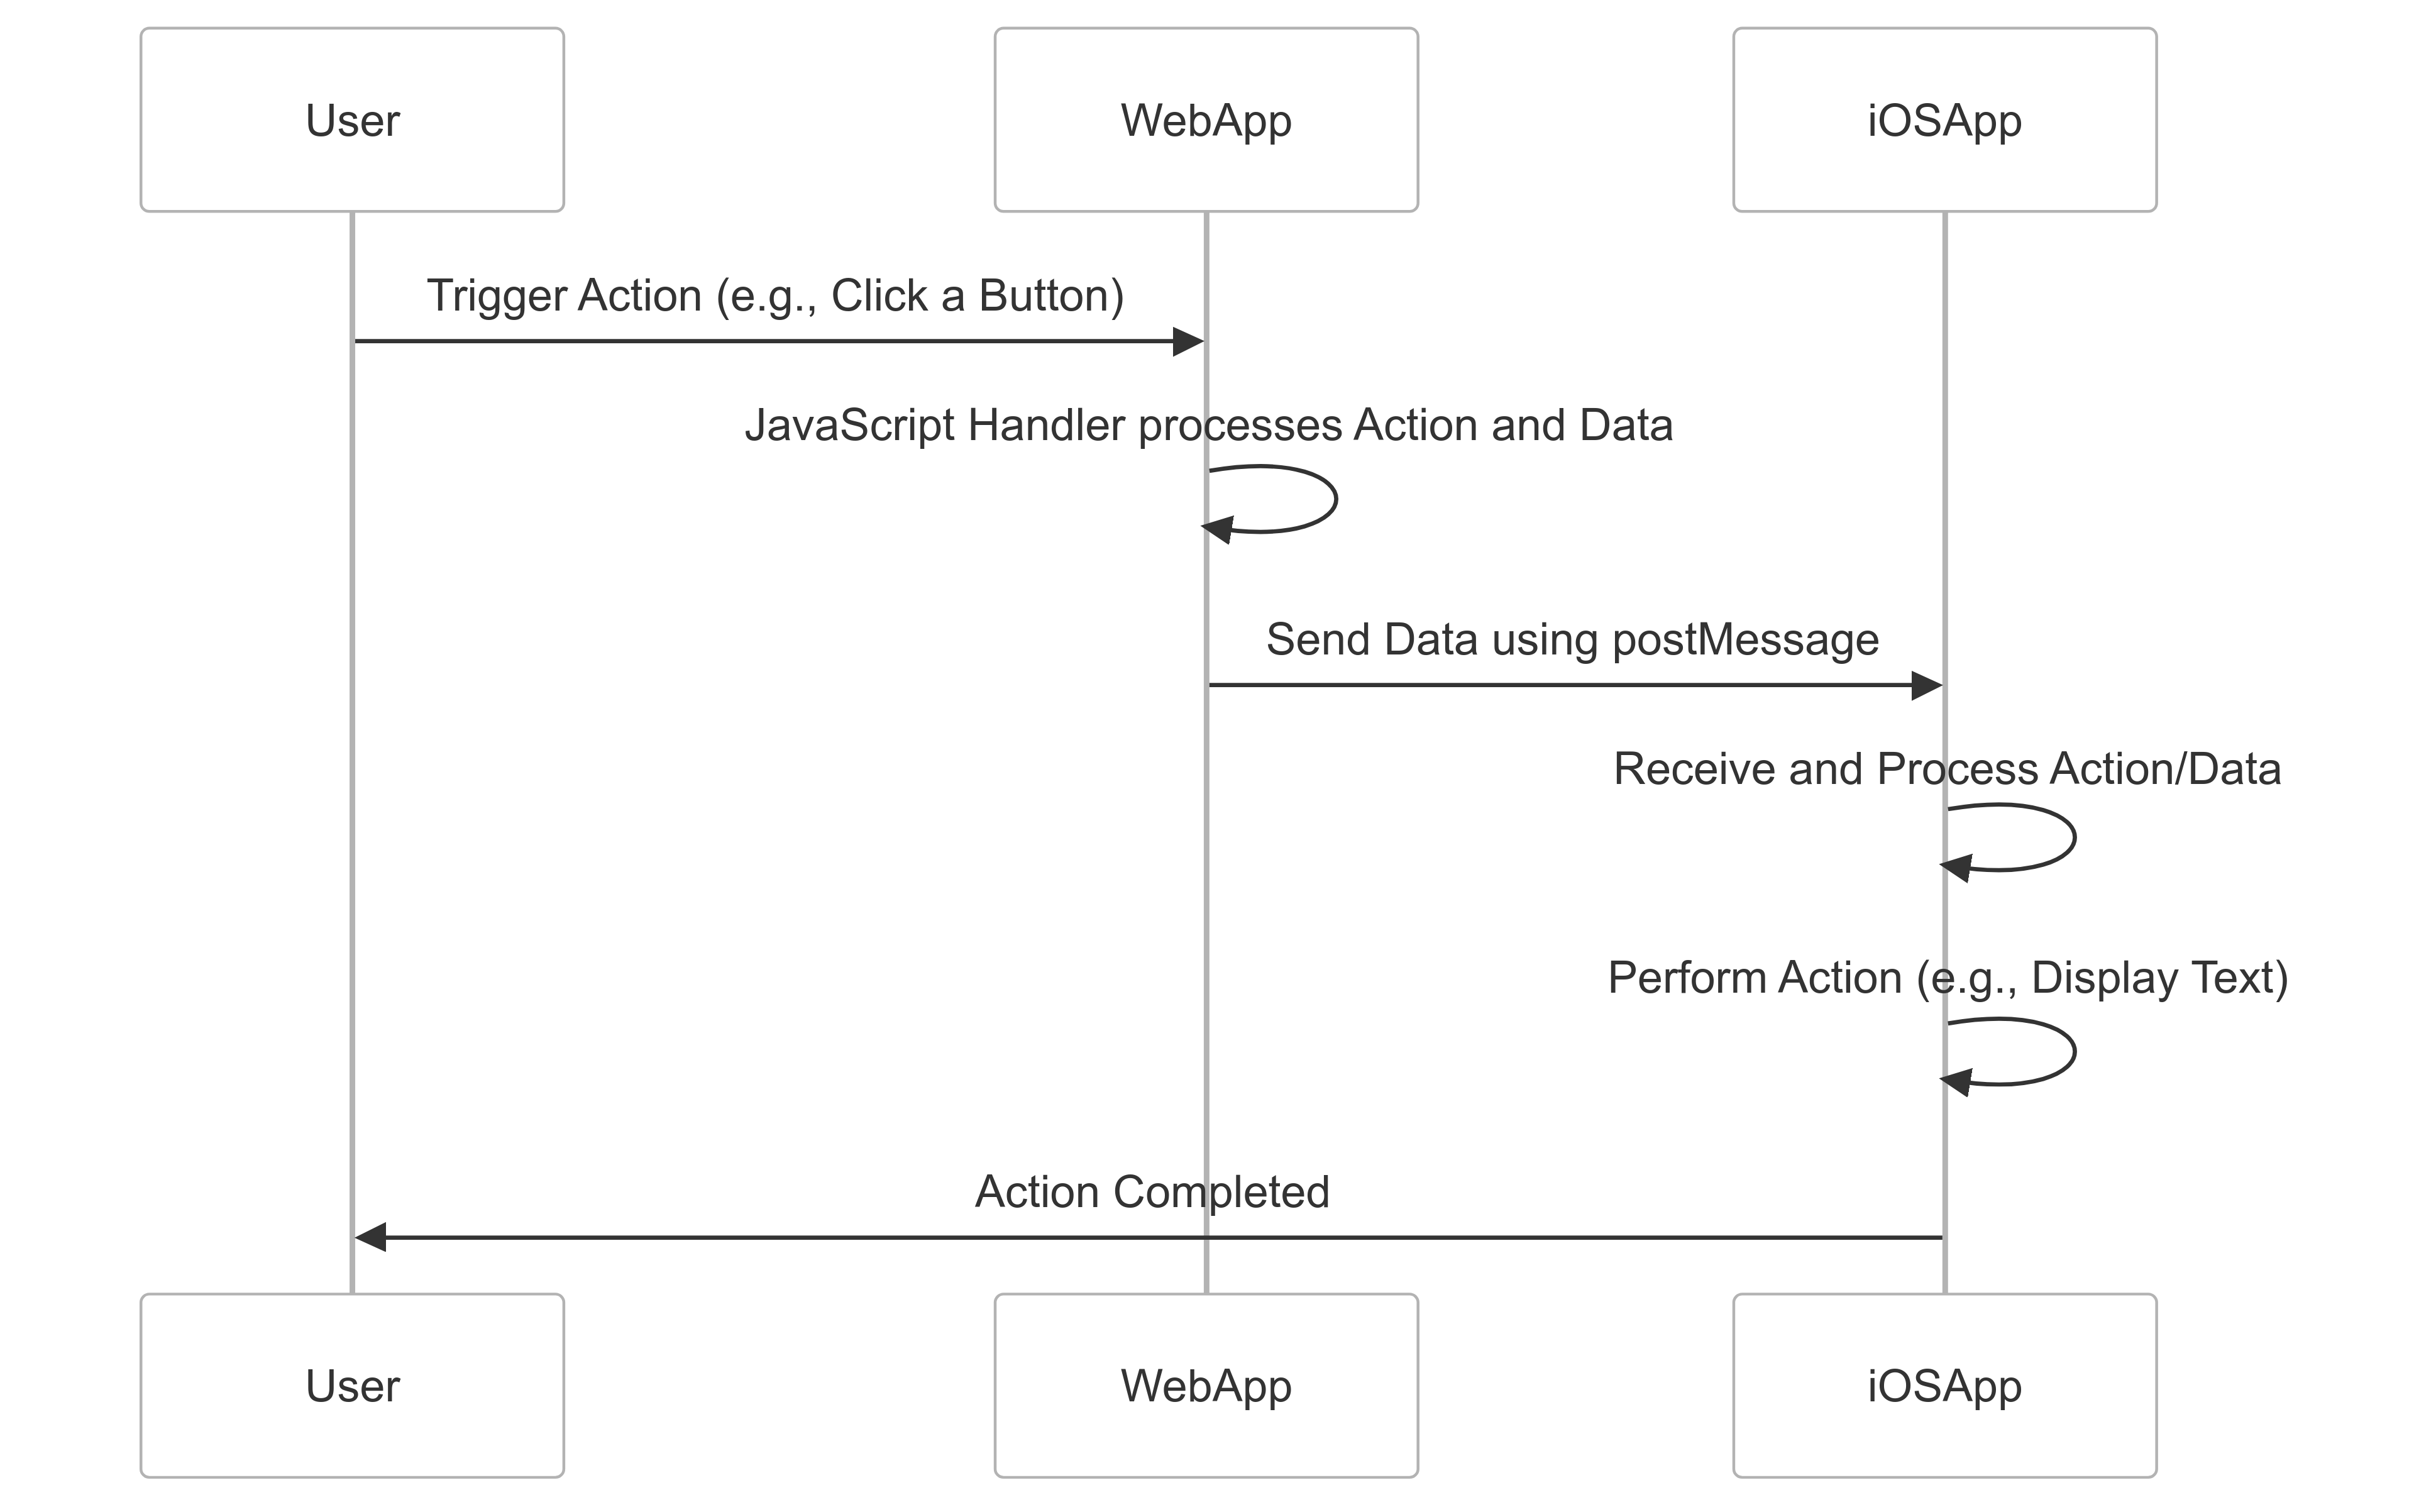
This includes sending predefined commands (e.g., displayText) from the web app to the iOS app.
Show Alert Message (displayText Action)
The displayText action demonstrates the ability of the web app to send data to the iOS app and trigger predefined actions. This simple logic highlights the capacity of the app to react to commands from the web app.
Key Steps
- The web app sends an action (
displayText) and associated data (e.g., a message) to the iOS app. - The iOS app processes the action and displays the message as an alert.
Sample Code
<!-- JavaScript handler for sending the displayText action -->
<script>
    function redirect(action, data) {
        if (window.webkit && window.webkit.messageHandlers && window.webkit.messageHandlers.AppInterface) {
            window.webkit.messageHandlers.AppInterface.postMessage({
                action: action,
                data: data
            });
        } else {
            console.error('AppInterface is not available.');
        }
    }
</script>

<!-- Button to trigger the displayText action -->
<div class="section">
    <h3>Show Alert Message</h3>
    <button onclick="redirect('displayText','Alert from Hackathon webapp')">Display Message</button>
</div>
3. Redirection to detail view page in web app through WebView in iOS app
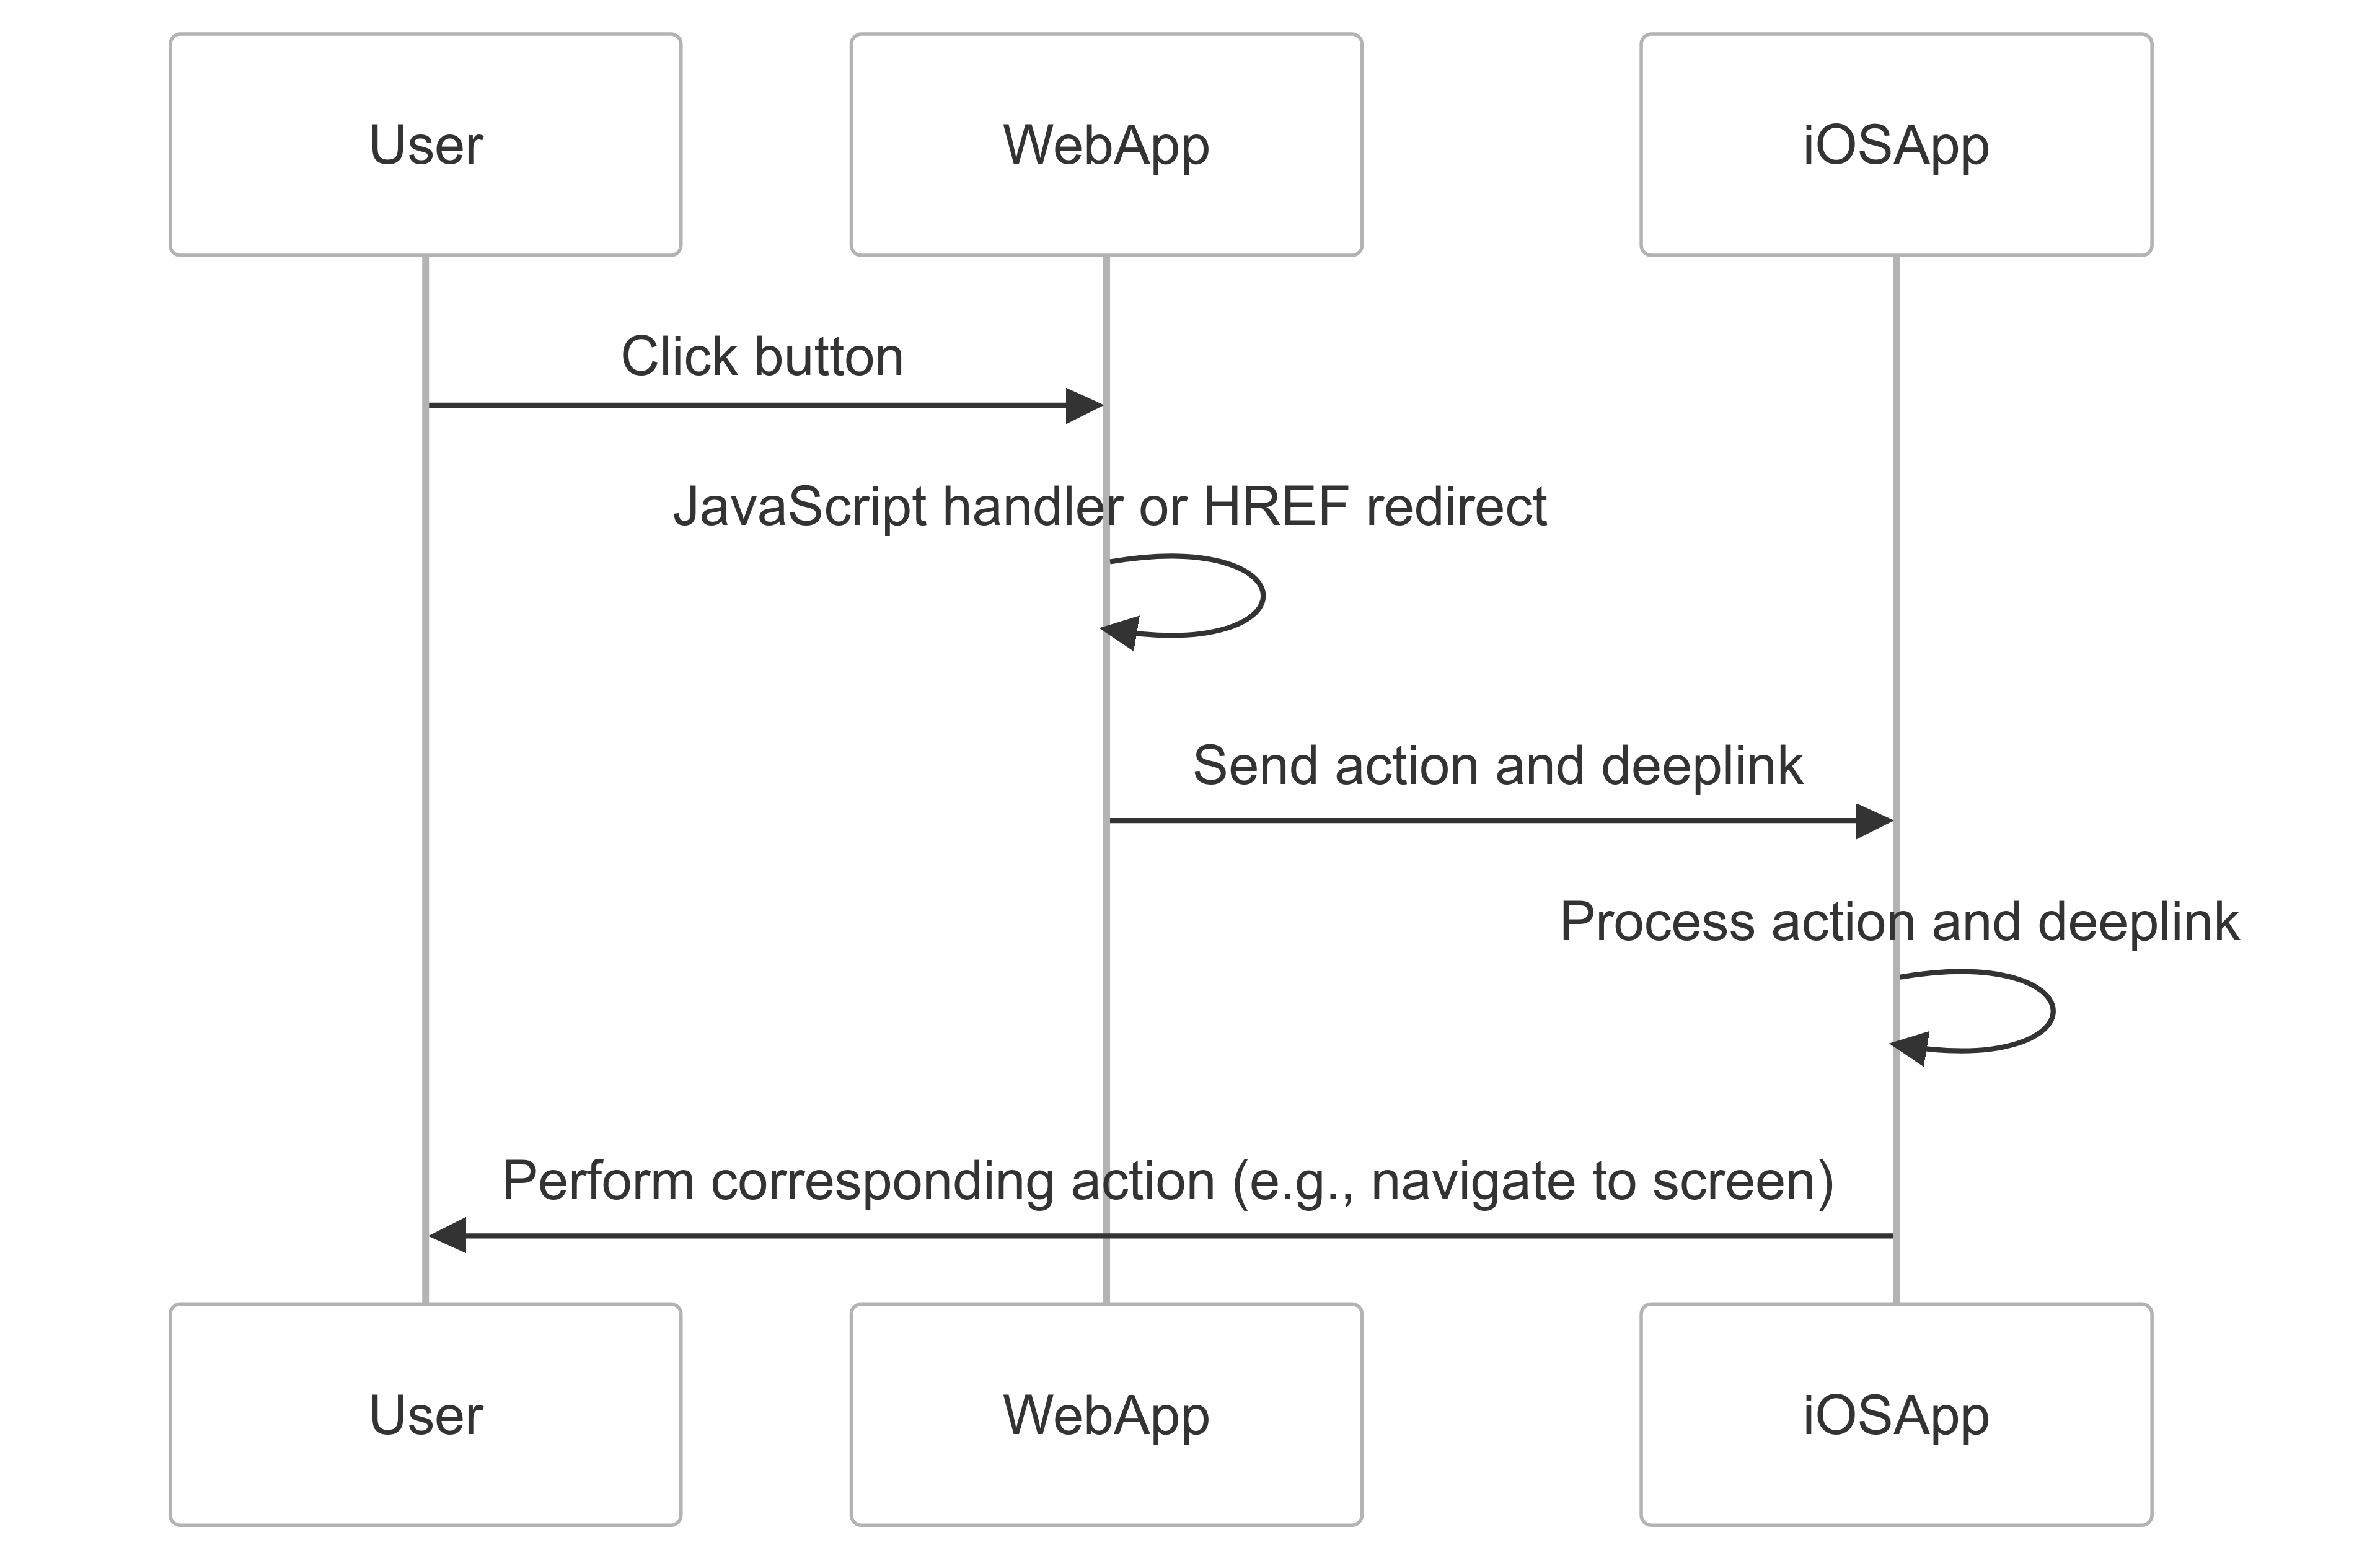
This covers redirecting users back to the iOS app using JavaScript handlers or HREF links.
User Redirection
The web app can redirect users back to the iOS app using either JavaScript handlers or HREF links. This functionality enables seamless navigation between the web app and the iOS app.
Key Steps
- JavaScript Handler: Sends actions and data to the iOS app.
- Redirect via HREF: Provides clickable buttons for navigation.
Sample Code
<!-- JavaScript handler for redirection -->
<script>
    function redirect(action, data) {
        if (window.webkit && window.webkit.messageHandlers && window.webkit.messageHandlers.AppInterface) {
            window.webkit.messageHandlers.AppInterface.postMessage({
                action: action,
                data: data
            });
        } else {
            console.error('AppInterface is not available.');
        }
    }
</script>

<!-- User Redirection Section -->
<div class="section">
    <h3>User Redirection</h3>
    <div class="section">
        <h4 class="section-title">User Redirection via JavaScript Handler</h4>
        <button onclick="redirect('deeplink','navidapro://healthmagazin/details?article_id=622')">Magazine Article</button>
    </div>
    <div class="section">
        <h4 class="section-title">User Redirection via HREF</h4>
        <button onclick="window.location.href='navidapro://challenge'">Goals</button>
        <button onclick="window.location.href='navidapro://symptomcheck'">Symptom Check</button>
        <button onclick="window.location.href='navidapro://doctorsearch'">Doctor Search</button>
    </div>
</div>
Conclusion
This document highlights the integration of the example web app through the WebView plugin in the iOS app. It demonstrates two-way data transfer, where the web app receives user details via a REST endpoint and redirects users back to the iOS app using JavaScript handlers or HTML HREF links.